In the race between perfection and completion, sometimes being done has to win. We’ve had a challenge winning that race consistently in some of our live event documentation. For example, the Arts and Humanities Colloquium event has been running at VIU for nearly a decade and the MRL has documented most of these hour-long presentations on video, first destined for DVD and later intended for DVD and streaming on YouTube. For whatever reason, that process was surprisingly slow and while workable, ineffective. First off, even though this is relatively simple ask, it’s not the only thing we do. We’ve struggled to consistently convert our raw footage into final products … let’s call it slippage between capturing, editing and ultimately distributing a final product. Initially we had a simple set-up with two video cameras and one external audio recorder. We collected raw material, transferred it to a computer after-the-fact and then assembled the various camera angles and audio feed(s) with added in peripheral materials (like presenter slides and titles) to produce a coherent final output. Easy, right. The thing is, getting the footage was time sensitive. You could only capture a live event, well, live. It happened when it happened with no wiggle room. Editing the material is another story. It got added to a less time specific ‘to do list’ and often got pushed by a lack of concrete deadlines and constant change of ab students. If only there was a way that we could a) do the editing quicker and, b) not impact our already limited ($0) budget. As they say, necessity knocked and we answered with invention. In the fall of 2017 we started experimenting with a different workflow based around using iPads to capture the video all linked to a central iPad that acts as a ‘live multi-camera switch,’ attached directly to an audio source that captured a direct feed from the presenter’s microphone through the central theatre soundboard and a computer that could be used to have a live feed of presenter slides. This let us capture, semi-edit, refine and then publish all within hours of the events we captured. In the day and age of live-streaming, it doesn’t sound like much but, let’s face it, live streaming effectively at a ‘pro quality’ is much harder and more expensive than most people make it out. At first, we used the original two camera approach as a backup while we worked out the bugs to the system. By now we’ve got the new rig working well enough that the secondary reinforcement isn’t quite so necessary and we go iPads alone (with the exception of still using the audio interface to connect the iPads to the central theatre soundboard, and a computer that we use to provide an ad-hoc Wi-Fi network to link the iPads and switch together and also to act as a video source for presenter slides). Since we already had the iPads, audio interface, and access to a laptop, the total additional cost to us, under $10cdn. Gear: Software: 1. First you have to install the software onto your iPads (or iPhones/iPods – we don’t use those but you can – you can even attach them to and control a DJI Osmo to control some basic panning camera movement but we haven’t tried that yet). The best part is that once the software is installed they don’t have to be on a shared account. That’s right, anyone who has the MultiCam appinstalled and running can join your set up as a camera (or you switcher) even if they bought and paid for it separately from you. 2. Next if you want to use your MacBook as a video source (for slides or to share other content from your computer as a part of your final edit), you’ll need to download the Switcher Cast applet. You don’t need to ‘install it’ so much as just ‘run it.’ 3. Once you’ve got your software ready you need to position your cameras (or get your camera operators in position to move them around as you wish) and connect the audio source to ONE of the iPads (either the main one that you’ll use as a switch or to one of the more stationary feeds that’s going to be closest to the main sound since you can’t change audio sources while you are recording. 4. Since the whole operation depends on WiFi you have to make sure that all of your devices are connected to the same network. Where we operate, we’ve found that it’s hard to avoid any network interference so we make an ‘ad-hoc’ or ‘computer-to-computer’ networkon the MacBook Pro that isn’t connected to the internet and we link all of the iPads to that. It’s surprisingly reliable 5. Once all of the devices are on the same network and the MultiCam and Switcher Cast apps are launched respectively, we pick one of the iPads to be the switcher (the one that controls and coordinates the others), and select the rest to be video sources. You can connect up to a total of 4 video sources (either including the one you are using as a switch or in addition, if you choose not to use the camera on the switch). 6. From there it’s fairly straight forward. As the event is about to start you press record and make choices ‘on the fly’ about what you’d like your final product to look like. The switching app has a four quadrant layout – one of the lower quadrants shows you your video feeds and the graphic overlays that you have uploaded and can use during your event. The other lower quadrant shows you your controls and options (transitions, audio monitoring, etc.) The upper two quadrants show you what the end product should look like (i.e. the layers that you are putting together) while the other gives you a ‘next up’ preview of the video/graphic sources that you have lined up to switch into the final record. 7. As your event proceeds you swap out video feeds and decide if you want on-screen video graphics. Each choice you make becomes part of the final compiled project. 8. Once everything is done and you press ‘stop recording’ the most tedious part occurs. Each camera source lives on its respective iPad while it’s being recorded. All the switch gets is a preview of what it will look like but it’s not until the end that the actual video from the remote video sources (iPad/MacBook) is transferred to the iPad you used as a switch. To get your final assembled product you have to collect the ‘journal’ of the video sources – depending on how good your network is and how long your recording is, this can take some time (and battery power). After all of your sources are downloaded to the main switching iPad, the switcher compiles the live edit choices you made while you were recording (all that stuff in the upper right quadrant) and produces a .mov format version that you can send to your iPad’s ‘Photos’ app or to ‘iMovie’ for further editing as you see fit. I’ve done some of the edits right on the iPad using iMovie and some on my MacBook Pro by transferring the compiled video and doing some final tweaks in FinalCut Pro or on iMovie for the Mac (where there are a few easier/nicer options for adding titles than on the iPad version of the same software). 9. If you want to upload your final product to YouTube, however, you’ll definitely need to transfer it off the iPad since the iPad seems unwilling to send anything longer than 15 minutes to YouTube directly. When we know that we are going to capture an event and we will use this iPad multi-camera live switch approach we have to do a little bit more up-front than before. Instead of anticipating how many cameras we will need to capture an event and then figuring out the details of what we’d like to appear on-screen at the final editing stage – creating and collecting on-screen graphics after-the-fact, we have to think that part through beforehand. That means that if we want to have a close-to-finished product by the time our filming is done, we have to have a ‘title page’ and any on-screen credits thought out and created in advance. This isn’t much more work than before, just a different order. Having to pre-plan like that, though, means that using this rig is less spontaneous than it could be but that’s okay if you know what you’ll be doing long enough in advance and/or if you have a set of ready-made graphics on-hand that you can use for recurring events (like we do in the Colloquium series where we mostly just change the presenter title page and names in the credits). Still, in it would be nice to add titles on the fly. Total time from idea-to-capture-distribution; about 1 to 2 hours before the event to create the graphics, 20 minutes to set up the capture hardware, whatever time you need to actually be at the event, and about 1 to 2 hours after to tweak the final output (plus however long it takes YouTube or your final destination to accept an upload). We can’t really ask for much more from software that cost less than $10. Still, it would be nice to add graphics and titles on the fly. The same company offers a ‘live streaming’ version of their software for a monthly subscription and claims to add live titles but for our budget and our needs that’s not really in the cards at the moment. One limitation of the software-hardware set-up, though, is that once you press record you can’t add a new camera feed or drop one of the cameras you are using (although you can simply ignore it and not use the feed but that seems like a waste). While we haven’t tested it, I don’t think you can change the audio feed either. On the audio front, unless you are using an external audio interface, the on-board microphones on the iPads are good but not great. If you are using an external interface, it can be a bit ungainly to get into the terrible world of Apple dongles to get everything attached. And in the case of using the Zoom H6 recorder that we use as an interface, you have to run off of batteries if you are using it to pass audio through to the iPad. They run a long time on batteries but it would be nice if we could power the Zoom directly without batteries. So far, we’ve only had our WiFi drop out on us once but only when we were in a test mode and not actually live recording. It would suck if it got interrupted since that would mean, at best, that we’d have to patch together a couple of different compiled recordings since there would be no way to ‘continue’ from a previous recording since starting and stopping the recording creates an entirely new project. PROS: CONS: It’s a great low budget set-up if you already have the hardware and you want to create a modular solution with a logical workflow and quality output aided by an impressive simplicity from idea to end product. Here’s an example of what we did using this set up (the second video is a ‘before’ using the older workflow of capture and then edit later using the original method). AFTER NEW WORKFLOW: BEFORE NEW WORKFLOW: If you want to see the full playlist click here.Our DIY iPad Multi-Camera Field Rig : Review
by Ravindra Mohabeer

Here’s what we did.
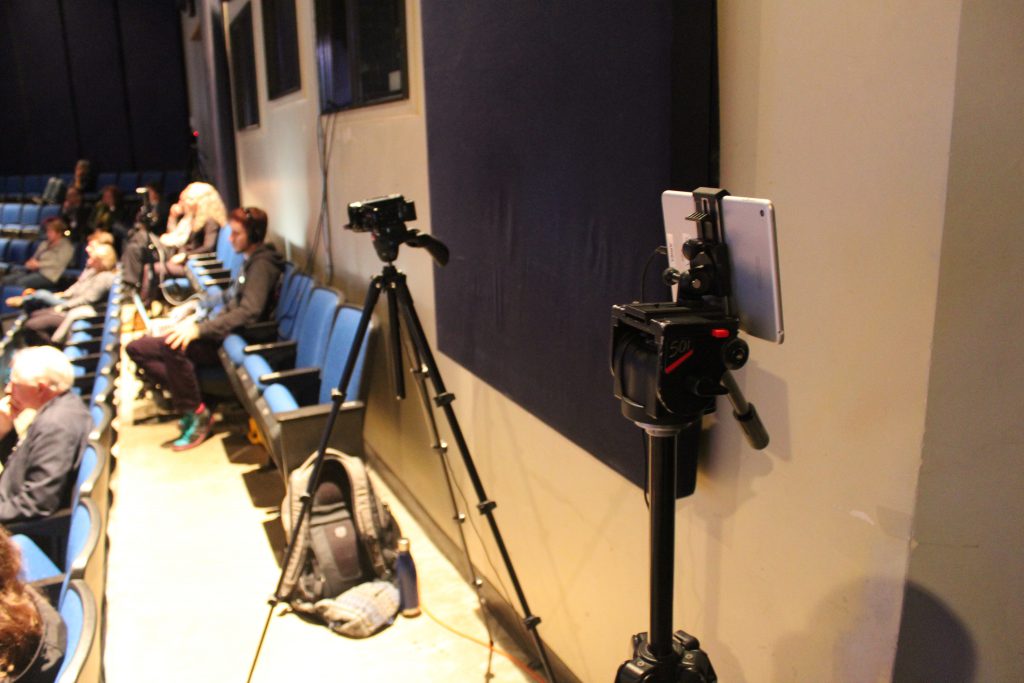
WHAT WE USE
HOW IT WORKS

MOVING FROM-IDEA-TO-CAPTURE-TO-DISTRIBUTION
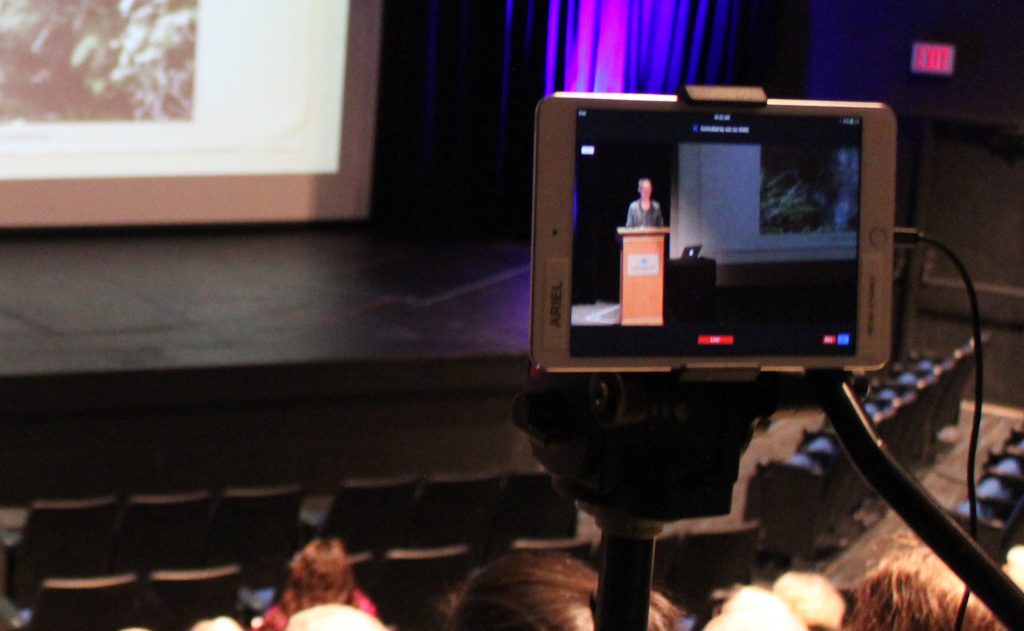
WHAT WE WOULD CHANGE
IS IT RIGHT FOR YOU?
VERDICT: